From Sketch to Shop Floor: How We Turn Venue Ideas into Floor Plans & Renderings
The short version: floor plans and renderings only help venue advertising when they explain the space fast, at the size people will actually see it, with labels that stay readable instead of merely existing.
If you are commissioning this kind of work, the usual questions are practical ones: What do I need to send before design starts? What is the difference between a floor plan, a rendering, and an ad mockup? What should I check before I approve anything? And why do small missing details turn into big revision loops later?
For broader planning context, teams can compare guidance from web.dev guidance before choosing a workflow.
This guide is the plain-language map. It focuses on the workflow behind venue advertising visuals, not generic print theory and not a vague “trust the process” speech. The goal is to help you brief a project cleanly, review it in the right order, and avoid the classic moment where text is technically present but somehow still unreadable.
Along the way, I’ll define the key deliverables, walk through the sketch-to-export workflow, explain how scale and viewing distance change design decisions, and end with a copy/paste brief template you can send to a studio. If you want broader context on the studio itself, start with the home page, or jump to the services page to see where floor plans and renderings sit alongside other venue advertising work.
What floor plan, rendering, and ad mockup mean in venue advertising
These terms often get bundled together, but they solve different problems.
Related implementation details are also covered in MDN Web Docs, which helps keep tool decisions grounded in established practices.
| Deliverable | Plain version | What it helps you decide |
|---|---|---|
| Floor plan | A layout drawing that shows the space, structure, paths, fixtures, and placement zones. | Whether the geometry, signage locations, and circulation logic are correct. |
| Rendering | A visualized view of the venue or display area, usually from a chosen angle and lighting setup. | Whether the environment, mood, and visibility feel right in context. |
| Ad mockup | A presentation of how the design will appear in the campaign, on-site, in print, or on a screen. | Whether the branding, hierarchy, and placement work in the real communication setting. |
A floor plan is the structural base. It answers “where is everything?” A rendering answers “what will this probably feel like from this viewpoint?” An ad mockup answers “how does the branded message land when all of this is actually used?”
In venue advertising, those three pieces often travel together. A brochure may need a simplified floor plan. A sales deck may need a rendering of the registration zone. A poster or presentation may need a mockup that shows how the campaign graphics sit inside the environment. Good work is not just pretty drawing. Good work lets a viewer understand layout, message, and priority in seconds.
If you want to see how this kind of work fits the studio’s broader project mix, the portfolio gives useful context, and the about page explains the working style behind the projects.
The inputs to gather before anyone opens a design file
The fastest projects are rarely the ones with the fanciest software. They are the ones with the clearest input package. Before the first sketch is cleaned up, gather the essentials in one folder or one shared thread:
- Venue basics: venue name, location, space type, campaign purpose, launch date, and what absolutely must be visible.
- Measurements: rough dimensions, wall lengths, aisle widths, room sizes, ceiling notes, door swings, fixed counters, screens, or anything else that cannot move.
- Reference photos: wide shots, detail shots, entrances, corners, and any angle that shows how a visitor will read the space.
- Brand assets: logos, color codes, fonts, approved substitutes, campaign copy, and existing signage examples.
- Viewing assumptions: where the audience stands, how far away they are, and whether they see the design while moving or while waiting.
- Output targets: final print sizes, screen dimensions, orientation, and where each version will be used.
That last point matters more than it sounds. A floor plan used inside a proposal PDF can tolerate a different level of detail than a floor plan printed on-site at large format, and both differ again from a digital screen version. The design file should know its destination before it starts collecting decorative ambition.
Two inputs deserve special attention:
Photos that match the real reading angle
A photo is not just proof that the venue exists. It helps set camera assumptions for the rendering and helps the designer understand what will compete with the artwork. If a wall sits beside a bright entrance or glossy floor, that affects contrast choices later.
Measurements with confidence levels
You do not need a dramatic survey document for every early conversation, but you do need clarity about what is confirmed and what is estimated. “Main wall roughly 6m, counter fixed, side display may change” is much better than silence. Missing dimensions create false confidence, and false confidence is expensive.
Step by step: from rough sketch to shop-floor-ready visuals
Here’s the practical workflow. Different teams organize the files differently, but the sequence usually follows the same logic.
1. Rough sketch: capture the idea before polishing it
The rough sketch is where intent shows up first. This can be pencil on paper, a marked-up PDF, or a loose digital block-in. At this stage, the question is not whether the final type style is perfect. The question is whether the layout story makes sense: entrance here, sponsor wall there, brochure stand near the queue, hero message visible from the main approach.
A good rough sketch names zones early. Registration, stage view, waiting area, brochure pickup, directional sign cluster. Those labels help everyone talk about the same space, which means fewer revisions later that begin with “I meant the other corner.”
2. Layout grid and structure: turn the sketch into a reliable system
Once the general layout is approved, the next job is structure. This is where the designer establishes proportions, alignments, spacing rules, and a working coordinate system. In plain terms, the design stops being a sketch and starts behaving like something that can survive changes.
The grid matters because venue visuals often need multiple outputs. The same base may feed a printed plan, a presentation board, a wayfinding panel, or a digital display. Without a structural system, each new version becomes a manual rescue mission.
3. Clean plan base: separate walls, paths, fixtures, and notes into layers
A floor plan base is the organized drawing underneath the styling. Walls, zones, circulation paths, signage markers, furniture blocks, annotations, and brand elements should not all live in one flattened mess. A clean layer stack makes edits quicker and handoff safer.
Typical layers might include:
- Base architecture or outline
- Fixtures and major objects
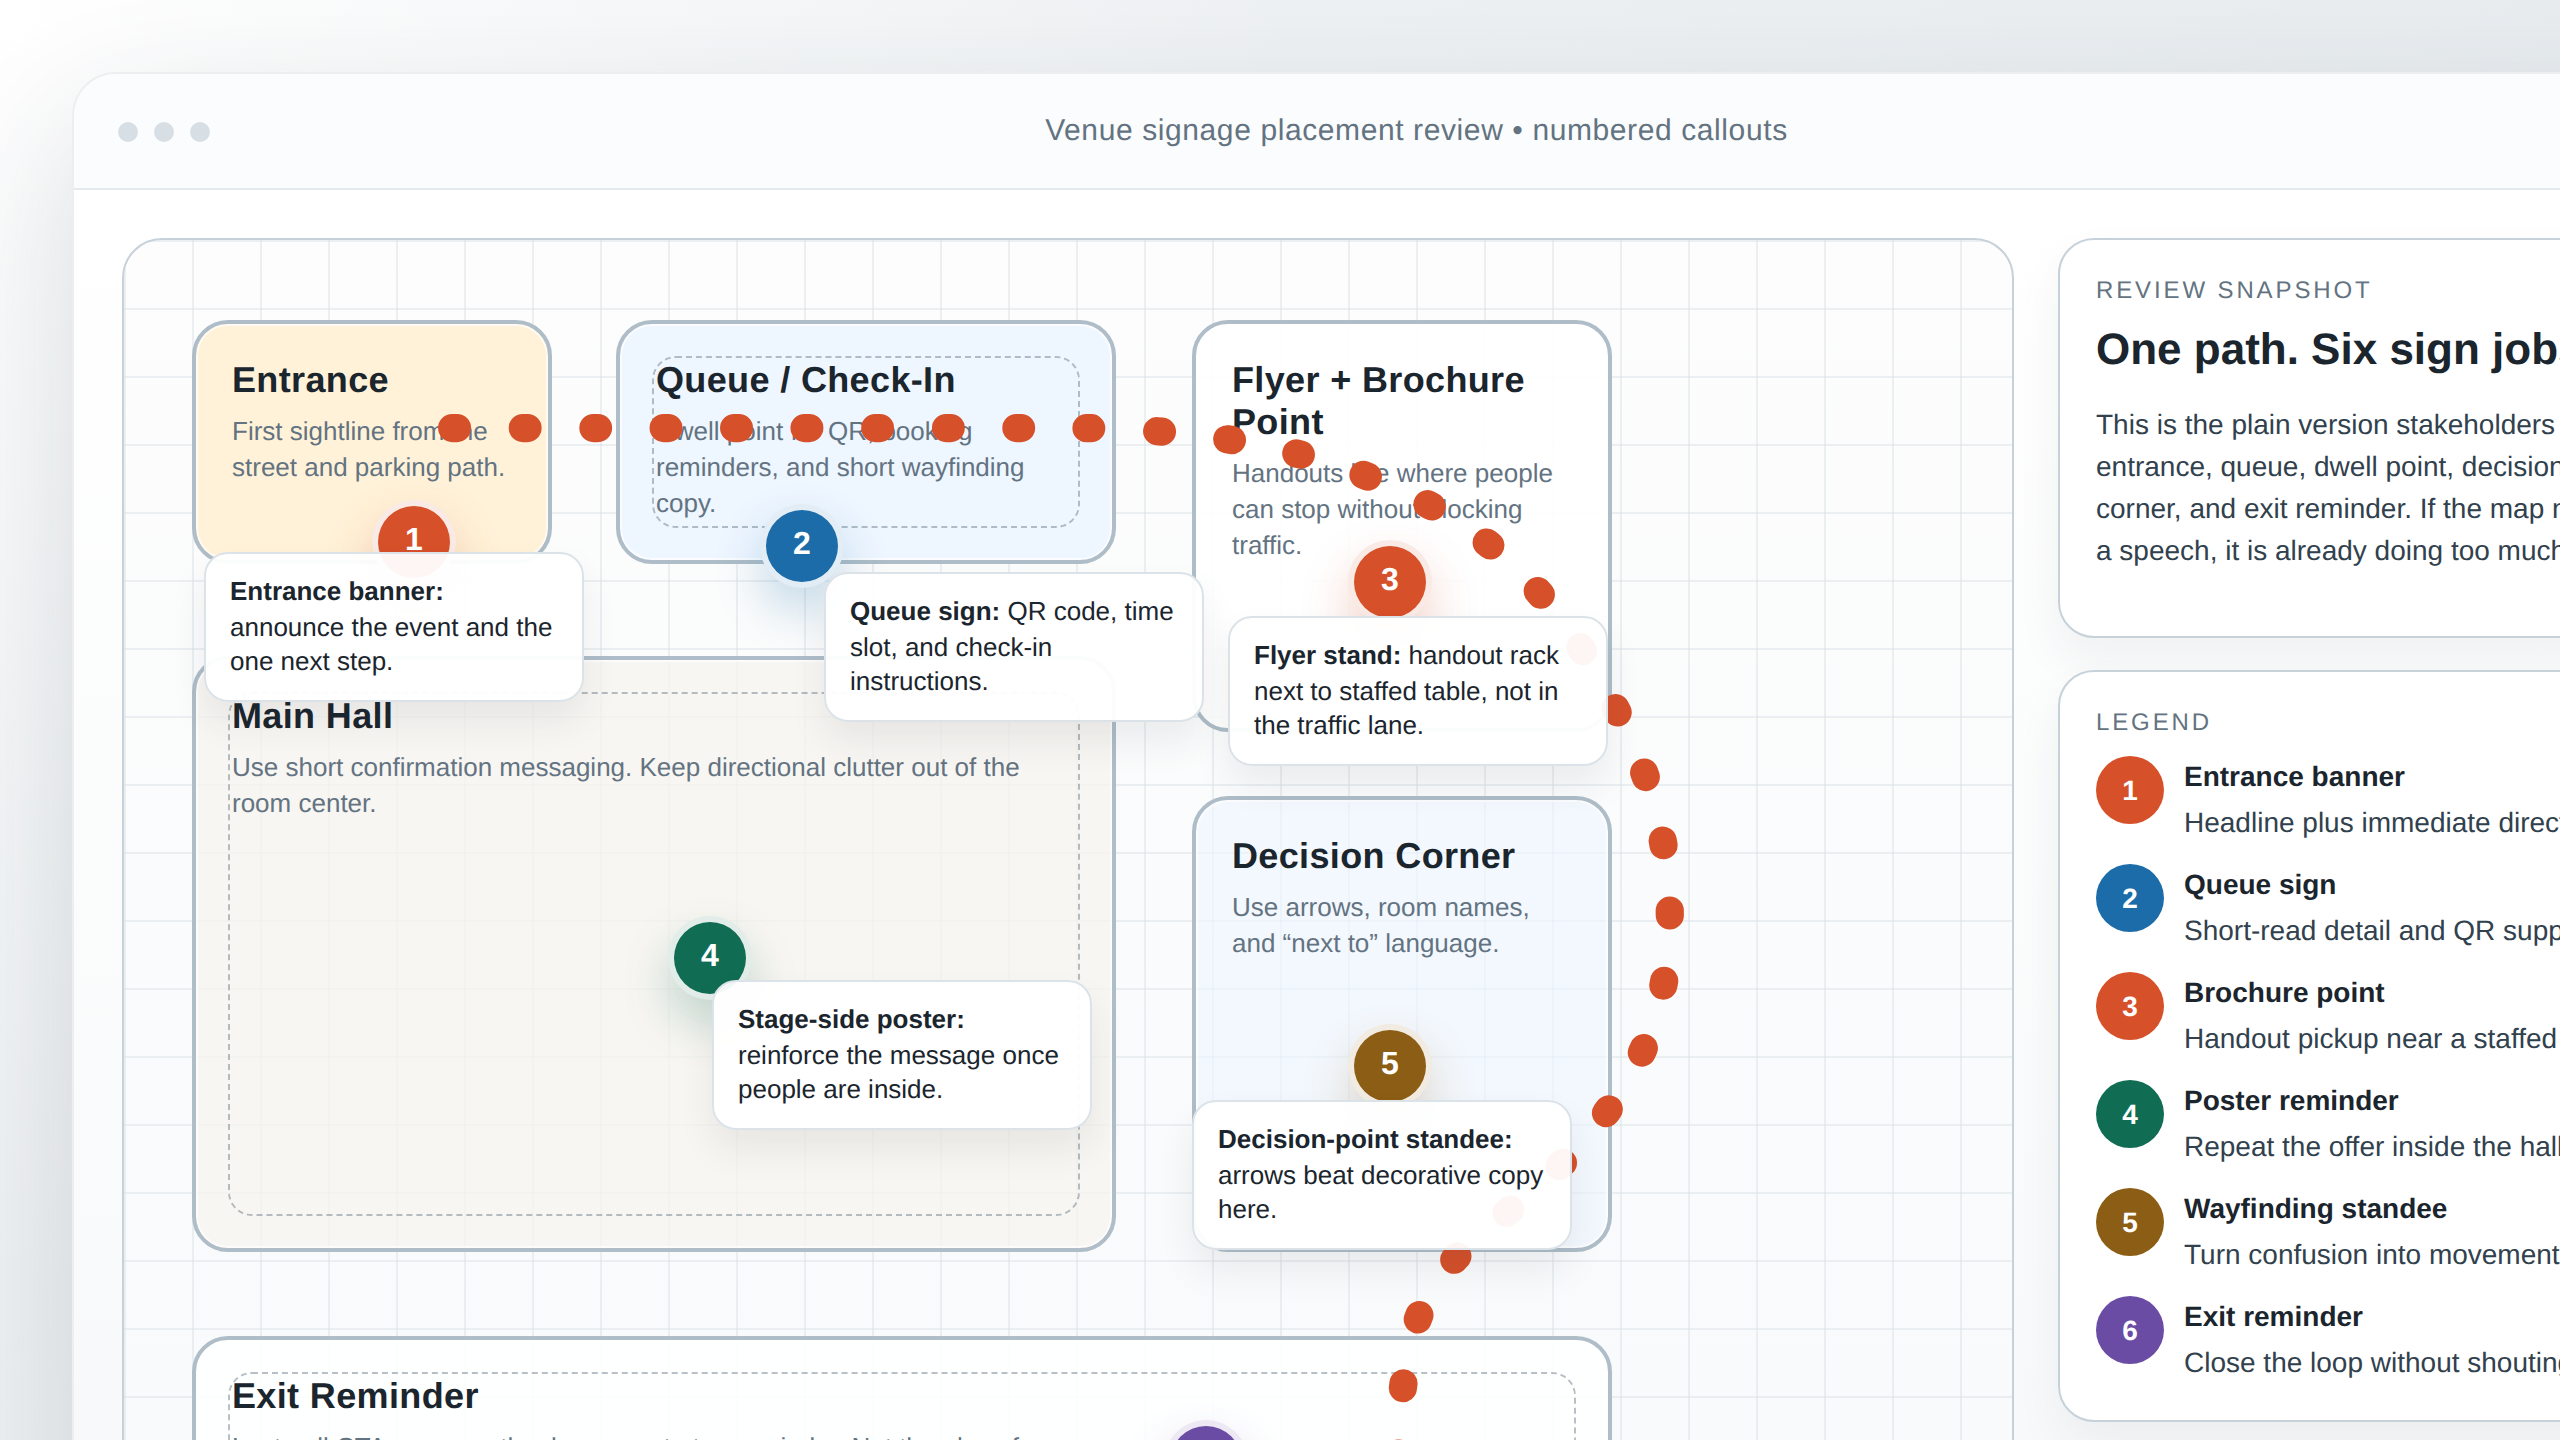
- Signage placements and numbered callouts
- Typography labels
- Brand color highlights
- Notes for print or export variations
If the project later needs one version with technical labels and one version with only client-facing labels, that layer separation suddenly looks very smart.
4. Typography placement: decide hierarchy before styling every label
This is where many projects either become clear or become crowded. Typography on a plan is not decoration. It is the instruction system. Readers need to know which text is primary, which is supporting, and which is optional detail.
A useful rule is to sort text into three groups:
- Primary: essential headings, main zones, main calls to action, orientation labels.
- Secondary: supporting location names, sign types, directional notes.
- Tertiary: small technical references, internal notes, version identifiers, or detail labels that are helpful but not the first thing the eye should catch.
Once the hierarchy is set, placement becomes much easier. Important text gets calmer space, stronger contrast, and safer positioning. Supporting text can live closer to lines or objects, but it still needs breathing room. If text is sitting on top of thin plan lines, image textures, or busy backgrounds, it may technically exist and still fail in practice.
5. Ad mockups: show the work in campaign context
After the plan base and rendering logic are stable, mockups connect the design to the real campaign. This is the moment when a nice isolated drawing becomes useful decision-making material. A mockup can show how the plan appears in a brochure spread, how a branded zone board reads from a hallway, or how the rendering will sit inside a pitch deck or event pack.
Mockups are also where brand consistency gets easier to review. You can compare logo sizing, headline presence, color balance, and supporting graphics in context rather than arguing in abstraction.
6. Review iterations: collect feedback by category
The fastest revisions happen when feedback is sorted. Instead of “make it pop,” try grouping comments into four buckets:
- Measurements and layout: proportions, positions, missing fixtures, incorrect paths.
- Hierarchy and typography: what should be larger, quieter, clearer, or removed.
- Brand consistency: logos, colors, approved fonts, and tone of copy.
- Export readiness: sizes, orientation, file types, and version naming.
That separation reduces churn because one kind of comment does not accidentally reopen every other decision.
Scale and readability: the part that decides whether people actually understand it
This is the section that saves the most pain. People sometimes treat scale as a technical accuracy issue only, but in venue advertising it is also a communication issue. A perfectly proportioned plan can still be a poor advertising deliverable if the message disappears at normal viewing distance.
Font sizing strategy
Font size should match importance and distance. Key zone names and directional messages need to be readable first. Smaller labels can exist for close-up review versions, but they should not compete with the information the viewer needs immediately. If every label is shouting, none of them are helping.
Contrast that survives the real environment
Brand colors matter, but visibility matters too. A subtle brand tint can look refined on a bright monitor and vanish against a lit display wall or glossy print. Text needs enough separation from its background, especially on renderings where shadows, textures, or reflections can swallow fine details.
Safe zones
Safe zones are the margins where you deliberately avoid putting important text or graphics. On plans and mockups, safe zones protect content from trim edges, display bezels, cropping, and visual clutter. They also protect against the very human habit of squeezing one more label into the corner because there is technically space there. Technically space and readable space are not the same thing.
Viewing distance assumptions
Ask a simple question early: where is the viewer standing, and how long do they have? A plan reviewed on a laptop at arm’s length can support smaller detail than a venue panel read while walking. A screen in a registration area needs instant hierarchy. A brochure spread can reward closer inspection. The file setup, label density, and contrast choices should reflect that.
Lighting and view assumptions for renderings
Renderings are easiest to derail when nobody agrees on what they are supposed to communicate. The goal is not always maximum realism. Sometimes the goal is clearer signage visibility, cleaner orientation, or a simplified preview that helps stakeholders approve placement without getting distracted by texture perfection.
Before rendering starts, it helps to define:
- Time-of-day feel: bright daytime, warm evening, neutral indoor light, or something more atmospheric.
- Light direction and emphasis: which surfaces or signs should read clearly first.
- Viewpoint: entrance perspective, eye-level visitor view, elevated overview, or detail close-up.
- Purpose: informational clarity, campaign mood, stakeholder review, or sales presentation.
A rendering can be visually polished and still be the wrong tool if it sells the wrong mood. For example, a dark dramatic scene may look impressive while making the actual sign hierarchy harder to judge. On the other hand, a brighter, flatter rendering may feel less cinematic but more useful for approvals. That is not a downgrade. That is choosing the right communication job.
Common pitfalls that create rework
Most revision loops are not mysterious. They usually come from a short list of predictable misses:
- Missing measurements: one omitted doorway, counter depth, or wall break can ripple through the whole layout.
- Unclear hierarchy: too many labels at the same weight make the plan feel busy and indecisive.
- Mismatched brand files: outdated logos, incorrect color codes, or substituted fonts create avoidable cleanup work.
- Export size surprises: the design was approved at one ratio, then requested later at another size that changes the composition.
- Mixed feedback: structural changes, copy changes, and stylistic tweaks arrive in one pile with no priorities.
The prevention strategy is simple: lock structure first, review hierarchy second, polish brand consistency third, and confirm export specs before final handoff. In other words, do not argue about the curtains while the walls are still moving.
Approval checklist: first review versus final sign-off
A two-stage review process keeps late surprises small.
First review: structure and comprehension
- Are the proportions, zones, and paths correct?
- Are the key signage positions in the right places?
- Does the typography hierarchy make sense at normal viewing distance?
- Are any labels missing, duplicated, or fighting with the drawing?
- Does the rendering viewpoint show what stakeholders actually need to judge?
At this stage, use a stoplight response if that helps:
- Green: structure is approved; move to polish and final prep.
- Yellow: mostly correct; a few contained tweaks needed.
- Red: core layout or hierarchy still needs revision before finishing work continues.
Final sign-off: asset correctness and output readiness
- Are the final logos, colors, and fonts correct?
- Has all visible text been checked for spelling and consistency?
- Are alignment, spacing, and safe zones clean?
- Do the exported sizes match the actual print and screen requirements?
- Are the filenames and version labels clear enough for handoff?
This split matters because it is much easier to fix structure before multiple output files are generated. Final sign-off should feel like confirmation, not discovery.
Export and handoff: print versus digital
Once the visuals are approved, the handoff should be explicit. “High-res” is not a full instruction. “Looks fine on my laptop” is definitely not a full instruction.
What to ask for
- Layered source files when future edits are likely and licensing allows it.
- Flattened delivery files for simple distribution, review, or upload.
- Print-ready versions sized to physical output requirements.
- Screen-ready versions sized to exact pixel dimensions and orientation.
- Version naming that includes project, output, and revision number, such as
venueplan_screen_1920x1080_v3orbrochure_A4_rendering_v2.
For print, confirm physical dimensions, bleed needs if applicable, and what “print-ready” means for the vendor receiving the file. For digital, confirm exact pixel size, orientation, and whether the screen has a frame or crop area that affects safe zones. Aspect ratio mistakes are one of the easiest ways to create last-minute redesign work.
It also helps to keep editable text and logo assets separate from flattened artwork when possible. That way small corrections do not require rebuilding the whole file. If your venue project also feeds a digital kiosk, booking screen, or internal tool, a separate useful resource for planning that side of the work is this web app generator, but the floor plan/export decisions should still be made around the real display size and viewer context first.
Copy and paste brief template
Here’s a template you can send when requesting floor plan or rendering work.
Project name:
Attach: project title or event name

Venue and space type:
Attach: address, room/area name, and one-line purpose of the space

Goal of the deliverable:
Attach: what this needs to help people understand or approve

Deliverables needed:
Attach: floor plan, rendering, ad mockup, print file, screen file, or all of the above

Final sizes and formats:
Attach: print dimensions, screen pixel sizes, orientation, and any ratio constraints

Measurements and fixed elements:
Attach: room dimensions, wall lengths, doors, counters, screens, stage, columns, or anything that cannot move

Required zones and signage:
Attach: list of labels, signs, sponsor areas, entrances, exits, and priority messaging

Reference photos:
Attach: wide shots, detail shots, entrance view, and any angle that shows how visitors approach the space

Brand assets:
Attach: logos, color codes, fonts or approved alternatives, and any campaign copy

Viewing assumptions:
Attach: where the viewer stands, likely viewing distance, and whether they are walking, waiting, or seated

Rendering style notes:
Attach: references for brighter/darker mood, realistic vs clean informational style, and any must-avoid visual direction

Review process:
Attach: who approves first review, who gives final sign-off, and preferred feedback format

Timeline:
Attach: first review date, final deadline, installation/live date, and any immovable milestones

Revision expectations:
Attach: whether you expect one review round, two review rounds, or staged approvals by department
If you send that in one package, the project usually starts faster and stays calmer.
FAQ
How long does this kind of project usually take?
It depends on complexity, number of deliverables, and how complete the inputs are. A straightforward plan update can move quickly; a package with multiple renderings, print outputs, and screen variations takes longer. The safest question to answer early is not “How fast?” but “What are the first review date and final output date?”
How many revision rounds should I expect?
That depends on the team and scope, but two-stage approval is usually the cleanest model: one round focused on structure and readability, then one round focused on polish and export readiness. More rounds are possible, but they go much better when each round has a clear purpose.
What happens if the venue layout changes mid-project?
Layout changes are normal, but they should be identified as structural changes, not small tweaks. A moved counter, resized wall, or new sign location can affect proportions, labels, mockups, and exports. Flag those changes early so the working file can be updated before final outputs multiply.
Do I need both a floor plan and a rendering?
Not always. If the main need is approval of placement and layout, a floor plan may be enough. If stakeholders need to understand atmosphere, sightlines, or how branding feels in the environment, a rendering adds useful context. An ad mockup helps when the campaign setting itself is part of the decision.
What is the best next step before asking for a quote?
Decide whether you need a print size, a screen size, or both. That one answer makes the brief more precise immediately. When you are ready, the contact page is the cleanest next step for sending your materials.
If you want help connecting the deliverable to a broader campaign package, review the services page first. If you want examples of related venue work, the portfolio is the best place to compare formats. And if you want the studio’s general approach in the plain version first, the about page is the quick read.