Print-Ready Ad Files in 2026: The Practical Export Checklist for Banners, Brochures, and Flyers
Why Print-Ready File Prep Still Causes Delays in 2026
Print production still slows down for the same unglamorous reasons: missing bleed, live text converted too early, placed images that are too soft, or a PDF exported with the wrong assumptions. In a studio setting, those errors cost time twice-first in review, then in correction.
The practical goal is not to chase an abstract ideal of a “perfect” file. It is to send a file that matches the printer’s workflow, passes preflight cleanly, and reduces back-and-forth before production starts. If you need a broader studio overview, see our services and recent portfolio work, or start from the contact page when a project needs a spec check.

Current Adobe guidance still centers on PDF workflows for print handoff. Acrobat’s print-ready instructions recommend PDF/X conversion for press-ready PDFs, while InDesign continues to support print export presets built around PDF/X output. For a standards-based reference point, ISO 15930-9:2020 defines PDF/X-6 as a PDF 2.0-based option for complete and partial print-data exchange. Adobe’s font guidance also remains clear: licensing and embedding matter, and PDF is usually the safest handoff format for preserving typography. Adobe Acrobat’s print-ready PDF guidance and InDesign’s export instructions are worth checking before you rely on a house preset.
When to Use PDF/X-4 vs PDF/X-6 for Ad and Brochure Delivery
| Workflow | Best fit | Why it is chosen | Watch for |
|---|---|---|---|
| PDF/X-4 | Most everyday ad, brochure, and flyer handoffs | Commonly accepted, preserves transparency well, and fits many vendor workflows | Still confirm the printer’s preferred color and output settings |
| PDF/X-6 | Projects that need a PDF 2.0-based workflow or vendor support for newer prepress handling | Current ISO standard option for more modern exchange workflows | Do not assume every vendor accepts it yet; ask first |
The decision is practical, not ideological. If the printer asks for PDF/X-4, use PDF/X-4. If a production partner supports PDF/X-6 and asks for it, use that. Otherwise, the safer default is the format your vendor knows best. The standard is only helpful if someone downstream can actually use it.
For the underlying standard reference, ISO’s page for ISO 15930-9:2020 is the cleanest public anchor. It confirms PDF/X-6 as a current standard option, not a universal mandate.
Font Handling: Embedding, Licensing, and When to Outline Text
Font handling is where many otherwise clean files become fragile. If a file depends on fonts that are missing, restricted, or substituted during export, the proof may look acceptable while the final plate does not. That is not a useful surprise.
- Embed fonts whenever the license permits it and the export format supports it.
- Verify licensing for commercial print use, especially with client-supplied fonts.
- Outline text selectively for final delivery only when the vendor requests it or when licensing / compatibility makes embedding risky.
Do not outline everything by reflex. Live text is easier to revise, easier to search, and usually better for version control. If you need to package a job for handoff, Adobe’s font packaging guidance is a useful reminder that font files are not decorative extras; they are part of the production asset set.
Image Prep: Resolution, Color Mode, and Avoiding Low-Quality Raster Assets
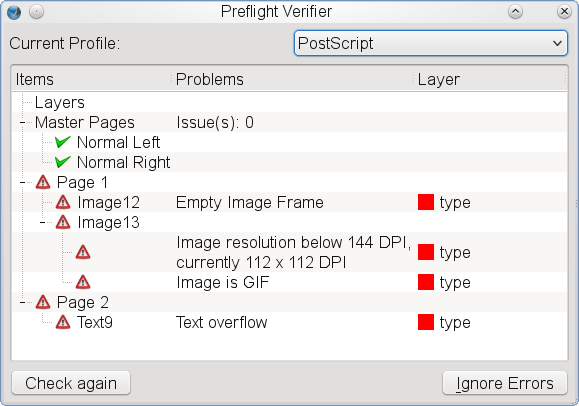
Image quality problems usually show up in the print file long after the design looked good on screen. The check is simple in concept, less simple in practice: make sure the image is appropriate for the final output size, viewing distance, and press process.
| Asset type | Practical check | Decision note |
|---|---|---|
| Large banners | Check effective resolution at full size and viewing distance | Large-format work often tolerates different effective resolution than a flyer |
| Brochures and flyers | Inspect placed images at final size, not just in the layout preview | Small formats expose softness quickly |
| Logos and line art | Prefer vector artwork where possible | Vector files scale cleanly and usually simplify print prep |
For color, keep the vendor’s workflow in mind. Many press workflows expect CMYK output or a controlled conversion path, while some modern PDF handoffs preserve color-managed data until late in the process. The right answer depends on the printer, paper, and proofing method. If a job requires accuracy, ask what they want before you flatten anything.
Adobe’s print export guidance and general preflight advice remain a good baseline for checking embedded imagery and output intent before you deliver the file. A short vendor conversation is still cheaper than a reprint.
Bleed, Trim, and Safe Area Rules for Banners, Brochures, Flyers, and Business Cards
Bleed and safe area rules are not guesses. They are production boundaries. The exact numbers vary by format and printer, but the logic is constant: anything that must not be cut off belongs inside the safe area, and any background that should extend to the edge must extend beyond trim.
- Banners: confirm hem, grommet, pole pocket, or mounting allowances before finalizing the canvas.
- Brochures: check folds, spine behavior, and which panel carries critical text.
- Flyers: keep headlines, logos, and contact details comfortably inside the safe margin.
- Business cards: be conservative; small formats punish edge-case placement.
There is no responsible universal bleed value that fits every shop and every substrate. The better rule is to adopt the printer’s spec sheet, then build to it exactly. If the spec sheet is missing, request it. That is not hesitation; it is control.
Export Settings Checklist for InDesign, Illustrator, and Acrobat Handoff PDFs
Use this checklist as a final export pass, not as a substitute for preflight.
| Setting | Recommended check | Common mistake |
|---|---|---|
| PDF preset | Use the printer-requested PDF/X preset when available | Exporting a generic high-quality PDF and assuming it will pass |
| Bleed | Include the vendor’s required bleed and crop marks if requested | Leaving bleed off because the artboard already “looks right” |
| Fonts | Embed or outline only when the workflow requires it | Substituting fonts after export |
| Images | Confirm placed files are linked correctly and not heavily downsampled | Embedding low-resolution imagery from a web mockup |
| Color | Match the printer’s CMYK / PDF color expectations | Sending an unreviewed RGB export to press |
| Transparency | Preserve transparency when the format and vendor support it | Flattening too early and creating artifacts |
InDesign is usually the cleanest export path for multi-page brochures and catalog-style assets. Illustrator remains practical for vector-heavy flyers or single-page layouts. Acrobat is useful for review, checking, and conversion, especially when the source file is already a PDF and you need to verify whether it is actually print-ready.
For broader context on print-safe PDF handling, Adobe’s current export and Acrobat print-ready pages are the most relevant public references. Use them as workflow guides, then defer to the vendor’s spec sheet. The vendor wins. The software merely helps.
File Naming, Version Control, and What to Send to the Printer or Client
Good file names reduce confusion before it has a chance to become a mistake. A practical convention is simple: project, format, size or version, date, and status. Keep it readable. If a file name looks like a lab sample, it probably needs another pass.
- Include the format: banner, brochure, flyer, or card.
- Include the version: v1, v2, final, or approved.
- Include the date: especially when multiple rounds are likely.
- Package supporting files: fonts when licensed, linked images, and any printer notes.
When sending to a printer or client, include the final PDF, a low-risk preview file if needed, and a short note that states what changed since the previous version. For cross-checking with the studio workflow, the portfolio can help frame expectations, while the about page explains the studio’s role and process, and the privacy policy covers how contact and project details are handled.
A Final Preflight Checklist Studios Can Reuse Before Every Job
- Confirm the printer’s spec sheet for bleed, trim, color, and PDF/X format.
- Check that all fonts are embedded, packaged, or intentionally outlined.
- Verify image resolution at final size and remove obvious low-quality assets.
- Make sure the correct color workflow is used for the intended press.
- Inspect bleeds, safe areas, folds, and mounting allowances.
- Run a preflight pass in InDesign, Illustrator, or Acrobat before export.
- Review file naming, version numbers, and delivery notes.
- Save a clean archive copy for future reorders or corrections.
The safest reasonable default is straightforward: match the vendor’s requirements, keep live assets intact until the final delivery step, and verify the PDF the way a print operator would. That is less dramatic than a miracle file, but much more useful.
If you want help aligning a banner, brochure, or flyer with the right production workflow, use the contact page to start the conversation.